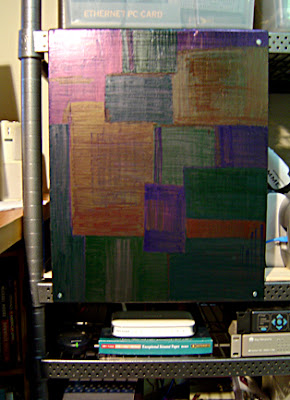
 The continuing adventures of making a black dry erase board.
I'd determined that my studio space was seriously lacking by not having a dry erase board hung somewhere. After a disheartening search of existing dry erase boards I discovered that none were cool enough: I wanted one like the kind they hand in Caribou.
After letting the third coat of magnetic primer dry, and deciding my board would never actually be able to hold magnets, I started with the blackboard paint.  This was a thinner consistency than the primer, and went on in watery blue streaks that I was a bit doubtful about. I washed my paintbrush again and waited hopefully for it to dry.
Now on the can it says to use a roller to apply the paint to the future blackboard, and I'd meant to do so, but after pouring the paint I realized that I was out of roller brushes. So I ended up having to apply the paint with the same paint brush I'd used for the primer and wasn't all that surprised when it didn't dry right. It did dry black, so at least one worry was gone, but it also dried in brush-stroke groves that reminded me of a vinyl record. I debated whether to run out and get a roller for the second coat, but in the end I was too lazy, and instead I applied the second (and last) coat very very gently so as to avoid the brush groves as much as possible.  After rinsing my brush and other supplies again, I waited some more.
I was happily surprised that the final coat was, I considered, smooth enough to actually use. So I waited another day as recommended for a full dry, then redrilled the holes in the corners, where the paint had closed them. I hung the board and tested it out.
#1: The staff at that particular Caribou are all liars! Ok, maybe that's a bit harsh, but they were certainly wrong about the dry erase markers being just normal dry erase markers.  I initially had some difficulty finding light colored dry erase markers; since most dry erase boards are white, naturally most of the pens to write on them are dark colors. Eventually however I found a pack of four neon colors. I tried them out, and to my dismay, the colors didn't show up at all. Actually that's not entirely true, when wet you could see wet streaks, and when dry, if you leaned up close, you could see the faint transparent lines. Picture transparent neon green on a blackboard... yeah... that's helpful.
#2: The staff at Caribou are STILL liars, because not only does the ink not show up, it doesn't wipe off. So now I've got a blackboard (which presumably you can write on with chalk at least, though I didn't try it out, so who knows) with ghostly lines in transparent dry erase ink that is stuck there permanently. I suppose I could have just used chalk, but my chair is at the same level as the black-white board so it would just have erased the marks I made when I spun it around and it hit against the board. In retrospect, I realize the same thing would have happened with the dry erase markers (had they actually worked correctly) so I can't be too upset about it really. So instead I set about decorating it in barely color.
 The end result actually looks kinda neat on camera (without the flash you can barely make out the color differences) but it is fairly useless as a message board. My cats on the other hand, are finding that it makes an entertaining passage through to the back of my computer.
Otherwise, I guess I just have a new piece of non-functional art hanging in my studio. Non-functioning art that in normal light looks just like a piece of wood painted black. Ah well, we'll call it "contemporary" or "conceptual" and maybe someone will give me a show...
A Certain Lack of Focus
Saturday, November 24, 2007
The Colors of Failure- Part II
Subscribe to:
Post Comments (Atom)


No comments:
Post a Comment